Wednesday, September 22, 2010

Preserving the Seasons


I have very recently discovered the joys of canning and preserving. As I shared with you previously, I began making refrigerator jams, in order to test my jam-making skills. The resultant jams seem very popular in my household, and therefore, I decided to try my hand at canning. Thus far, I have only made 2 jams: a peach jam and a raspberry jam. I used two different recipes and books to try out different styles.

Since there are very serious health concerns involved with canning, I am only going to refer you to the sources I have used, but not give a recipe or instructions. I am only an amateur myself, after all. The first book I read and used is The Beginner's Guide to Preserving Food at Home by Janet Chadwick (2009), and the second is Canning For A New Generation by Liana Krissoff (2010). The Beginner's Guide gives very specific instructions for preserving foods by canning, freezing, and dehydrating, as well as traditional-style recipes. Canning For A New Generation is a younger, hipper take on canning, with a modern feel to the recipes. The recipes are also more health-conscious, including ways to reduce the amount of sugar by using other ingredients.

I have to say that the first time I went through the process it was frustrating, but by the second round I had become more comfortable with the steps. The entire process (from sterilizing the jars, to making the jam, to finally "processing" the filled jars) does take some time, but if you can make big batches, I believe it will be worth your while. I started by making small batches of each jam, since I had never tried the recipes or the process before, but now I see that I could save a lot of time and money by making a much larger batch of jam in order to fill multiple jars at a time.

The options for what foods can be preserved are endless and this has opened up a whole new world for me. What a great way to eat and buy seasonally, but still be able to enjoy summer produce, such as raspberries, during the rest of the year. Next up for me: dehydrating tomatoes.

Friday, September 17, 2010

End of Summer "Caprese" Salad


As the end of summer approaches, we decided to feature tomatoes in a side salad with leftover soup the other night. I was able to get some amazing organic junior beefsteak tomatoes at the farmer's market, along with fresh basil. Instead of mozzarella, we decided to make a twist on the traditional Caprese salad and use cottage cheese, for the lighter taste and high protein content.

Since we were having spiced vegetable soup (with some fava beans), we wanted to make a salad that would be healthy, but at the same time contribute some extra protein to the meal. To make this salad, simply slice ripened tomatoes and line them up on a serving plate. Spoon small amounts of low-fat cottage cheese between the tomato slices. Top with chopped fresh basil, season with salt and pepper, and finally sprinkle the whole salad with olive oil.

This is a great, inexpensive way to enjoy seasonal ingredients. Cottage cheese is cheap, high in protein and other nutrients, and can be obtained at any grocery store. As for the tomatoes and basil, I recommend trying to get the freshest and highest quality produce you can (if you have a farmer's market or produce stand in your area, this would be ideal).

Sunday, September 12, 2010

The Freezer Is My Friend


During the summer, Adam and I tend to use fresh ingredients and make our food from scratch each day. For lighter meals, we have salads or soups, but do not generally utilize leftovers as much as we normally would. This is mainly due to the abundance of fresh produce we want to take advantage of, as well as the higher temperatures which tend to curb our appetites for warm foods.

With fall approaching, it is time to re-discover the most useful appliance in our kitchen: the freezer. Nine months out of the year, our freezer plays a prominent role in our daily food lives. We make large batches of soups, stews, chilis and various bean dishes, amongst other things, only to freeze the leftovers for another day. This is a great way to save time and money, since making a large batch of any type of food is generally less costly than making multiple smaller batches.

Freezing is also useful for those of us who eat meat and fish. We usually buy meats in larger quantities and freeze portions. This way, we can take advantage of specials and family-packs offered at the grocery store. Buying meat in this way, as opposed to just enough for one meal at a time, is another great money saver.

Lastly, I like to buy summer produce to freeze for later use at times when it's not possible to buy locally. For instance, this is a great idea for berries of all kinds. Buy a large flat of berries from your local farmer's market, wash, dry, and spread out on a baking sheet. Place the baking sheet in the freezer for a few hours, allowing the berries to begin freezing individually. Once the berries are slightly frozen, you can store them in a freezer-proof plastic bag, and enjoy fresh, local produce for the rest of the winter. To defrost, put the berries in the refrigerator to thaw and then use in baking, or to make compotes. Defrosted berries will even do well plain in yogurt, with a slightly mushier consistency.

Freezing foods provides a fast, easy way to have homemade meals when you are short on time and energy. Making larger batches with the intention of freezing leftovers can set you up for great fare later when you have evening activities, are tired from work, or just don't feel like cooking. The benefits are enormous since you will save money on take-out dinners, and probably be eating healthier homemade foods.

Thursday, September 9, 2010

Edible Explorations Book Club: Animal, Vegetable, Miracle


In trying to decide what to write about Animal, Vegetable, Miracle by Barbara Kingsolver (with Steven Hopp and Camille Kingsolver), I was conflicted. On the one hand, the book is full of useful and interesting information, both about eating locally and about raising animals and vegetables on your own. However, while I was reading the book, the tone of Kingsolver's writing failed to resonate with me as a reader.

The idea of living locally for a year is not unique, but it is interesting to read about how the changes in the land and the climate affect one's ability to live off the land. I found the family's ability to avoid processed and large-scale produced food to be most interesting and relevant for me personally, as opposed to the accounts of living mainly off of their own land. Since I do not own a farm in Appalachia (as she does), I cannot sustain myself by growing my own vegetables and raising my own poultry. However, this book did inspire me to try harder to live locally, and mainly to continue my quest to eat seasonally.

Although the book presented an interesting narrative, it did read more like a novel than a non-fiction account of a family's experiences on their farm. At times, I would have liked to learn more specifically about how they accomplished their feats. Kingsolver does present her story as educational for the general public, but omits the details of how we, the masses, can really try to accomplish some of what her family has done.

Returning to my conflicted feelings for a minute, I have been trying to decide what to write about the tone of the book. I found it difficult to connect with Kingsolver's writing, as it was at times preachy and overly-saccharine. She seemed to be trying to tell the reader what he/she should be doing to live more sustainably, but without backing that up with real ideas or facts.

If you are interested in a light read about food culture, this is a good book for you. However, if you are reading it expecting to educate yourself on how to implement these ideas on your own, you may want to look elsewhere for your information. I would recommend Anna Lappe's books as a more informative, less self-righteous body of work.

Saturday, September 4, 2010

Fig and Lime Jam


I have been wanting to try my hand at making more jams, chutneys and preserves, but I have not yet advanced to the full canning and preserving stage. Therefore, I decided to make a seasonal refrigerator fig jam, just to try a recipe and decide whether or not this is a cooking arena I would like to pursue further.

With a refrigerator jam, you do not go through the canning process, but instead keep the jam in the refrigerator for a few weeks (hopefully you will have eaten it by the time it would go bad, but it will go bad eventually).

Figs are in high season right now, and I bought a pound from my local farmer's market earlier this week. I love to eat fig-infused foods, but I have, in the past, had trouble finding ways to prepare figs. A jam seemed like a viable option. I found the recipe in my Cooking Light reserves (June 2010). In my version, I did cut out some sugar, because even Cooking Light's sugar levels seemed excessive.

1/2 cup sugar
1/8 cup lime juice
1 pound fresh Black Mission Figs, cut into small pieces

Combine all of the ingredients in a large saucepan and mash with a potato masher until thoroughly mixed. Let stand for 2 hours, allowing the flavors to intermingle.

Bring the mixture to a boil over medium-high heat. Reduce the heat and simmer for about 30 minutes, or until the mixture begins to thicken. Stir occasionally. Spoon into a clean jar, let cool slightly and refrigerate.

If you are using a type of fig that is not as sweet as the Black Mission Figs, you may want to increase the amount of sugar slightly.

Tuesday, August 31, 2010

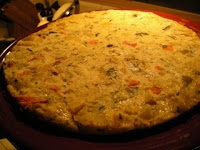
Summer Vegetable Tortilla


At the end of last week, Adam and I roasted a very large batch of summer vegetables: zucchini, tomatoes, broccoli, potatoes, peppers, and celery. We ate these for dinner on Thursday with a meat sauce, added some of the leftovers to our Greek salad on Friday, and finally used the remains for a Roasted Vegetable Tortilla (or a cross between a tortilla and an omelette) on Monday. This turned out to be a tasty, and very budget-friendly way to enjoy the vegetables of the season. These are all dishes that everyone can make - it's that easy!

To roast the vegetables, simply chop them into large pieces, throw them into a roasting pan, coat with oil, season with salt and pepper, and place in a 400 degree oven for approximately 45 minutes. Stir the vegetables once or twice and test periodically with a cake tester. If you are using small tomatoes, add them whole after about 30 minutes, to avoid over-cooking them.

We sometimes add some chopped herbs as well, depending on how we are serving this. Roasted vegetables are great with fish and meat dishes, or with a yogurt-chutney sauce and a salad as a lighter meal.

For the tortilla, chop the leftover veggies into smaller pieces, and add them to a mixture of:

4 eggs, whisked
~ 1/4 cup Plain Yogurt
~ 2 tbs. Oat Flour
A Small Handful of Herbs (Sage and Parsley in our case)
1/8 tsp. Salt (since the roasted veggies are already salted)
Pepper to taste

Combine all the ingredients. Heat olive oil in a non-stick pan. When the pan is hot, add the mixture and stir for a few moments, until the eggs just begin to cook. At that point, spread the batter out evenly in the pan and let cook, covered. If the tortilla is browning too quickly on the bottom, turn the heat down for the rest of the cooking time. The tortilla is done when the top has set.

Roasting veggies are a cheap and flexible way to use vegetables you have around the house, augmenting with in-season veggies from the store or farmer's market. If you are able to make a big batch, you really can produce food for several meals at once, saving time, energy, and your budget.

Saturday, August 28, 2010

Feeding Your Pet (Cat) Update


When I last wrote about my cat food troubles, I promised to post an update when my research had progressed further. I have continued to read and research the pros and cons of various brands and types of food. After reading Ann Martin's book Foods Pets Die For, I felt I needed to try some of the "natural", "healthier" brands. However, Kia did not take well to several brands that I tried. In fact, she had trouble keeping her meals down.

I then heard about a book that had just come out by Marion Nestle and Malden Nesheim, entitled Feed Your Pet Right: The Authoritative Guide to Feeding Your Dog and Cat (2010). Marion Nestle is very well-known for her work on human nutrition and the food industry, so I knew that she would have done her research. According to these authors, unless you make your own pet food, there is not a significant difference in the quality of the food in the major brands, even the ones labeled "natural".

However, I did read in both sources that feeding your cat a diet of too much fish can be detrimental because, historically, this is not a source of food in the wild. Therefore, cats may not get all the nutrients they need from fish. In addition, the mercury content in certain fish can be harmful, as it is to humans. I was giving Kia mainly canned food with fish flavors, and therefore, I have switched to beef and poultry. I have stayed with Fancy Feast wet food and Science Diet dry food, though, because she seems to react well to those brands.

I still maintain hope to one day switch Kia to homemade food, but additional research is still needed to make that transition.

Tuesday, August 24, 2010

Tina and Adam's Granola


We, in my household, are big fans of granola. We like granola with our yogurt, milk, or kefir. In the past, we bought Trader Joe's granola, most often the Vanilla Almond flavor. However, as we were going through quite a lot of this product each week, we started to take a closer look at the nutritional content. Although Trader Joe's granola is very good, it does contain a higher amount of sugar than I would like. Therefore, about a year and a half ago, we came up with our own recipe.

I have mentioned before that Adam does a lot of the everyday cooking in our house. However, granola is my territory. We came up with the recipe together, but I took responsibility for making a big batch every couple of weeks. Over time, I have tweaked the recipe slightly, and will share it with you in its current form.

1 1/2 lbs. rolled oats (regular, not quick cooking)
1 1/2 tsp. cinnamon (or to taste)
1/2 tsp. salt
1/2 tsp. vanilla extract (or to taste)
1/4 cup honey
1/2 cup molasses
1/4 cup grapeseed oil
1/4 cup water
2 cups mixed nuts, chopped
1 cup dried cranberries or raisins

Preheat the oven to 300 degrees Fahrenheit and line a cookie sheet with aluminum foil.

Mix the first 8 ingredients together (through water) in a big bowl, using your hands to clump the oats together. Once everything is well blended, pour the mixture onto the lined cookie sheet and bake in the oven for 10 minutes.

While the granola begins to bake, chop 2 cups of nuts (I usually use almonds and walnuts, but the recipe is completely flexible). After 10 minutes, remove the baking sheet from the oven and add the chopped nuts, stirring to mix with the oats. Bake for another 15 minutes. Again, remove from the oven and stir the mixture carefully. Finally, bake for another 15 minutes and remove from the oven. At this time, stir in the dried fruit and let cool on the cookie sheet. When cool, store in a sealed container to keep fresh.

This recipe can be made in many different ways. I have experimented with various dried fruits, chopping the larger pieces when necessary. For instance, I recommend dried apricots, cherries, or prunes. I also think dried blueberries or strawberries would be very good. The same idea applies to the nuts that you decide to include. You can just use one kind of nut, or several, or a complete mix.

This is a great money-saver for us. One batch of this granola lasts much longer than any box, or several boxes, of store-bought granola. We have many of the ingredients at home already for baking or other cooking, and the nuts and dried fruit can also be used as snacks. Buying regular rolled oats, especially in the bulk section of your supermarket or natural food store, is very budget-friendly, and as I said, a little goes a long way.

Friday, August 20, 2010

Rosendals Gardens


While on my recent trip to Sweden, I went somewhere in Stockholm that I had never been before, and it blew me away: Rosendals Gardens. The gardens are located on Djurgarden, an island within the city limits. They originally belonged to Rosendals Castle, built in the early 19th century by King Karl XIV Johan. Today, these gardens are maintained by a private foundation, but open to the general public.

The main focus is on organic garden cultivation, with vegetables, fruit orchards, and even wine grapes all being grown organically. Visitors are free to walk around and learn about how the different foods we eat and drink grow and develop. Produce from the gardens is sold in a shop on the premises, and there is a cafe serving only food from the gardens or the bakery on-site.

I was amazed at seeing how food that I eat every day grows. I had never seen an artichoke plant before, for instance, and had absolutely no idea it grows on a stalk. I wish we all could have the opportunity to get in touch with our food at this level and really understand the process of producing ingredients for the meals we eat, both at home and in restaurants. I know it has opened my eyes, and has increased my respect for nature and organic farming.


Tuesday, August 17, 2010

The state of Sweden's school lunches

I am finally back from my trip to Sweden and able to post on my blog again. While I was away, I read a very interesting article in the Swedish newspaper Dagens Nyheter about the state of food available in schools and homes for the elderly. For completeness, I am providing a link to the article here (DN Debatt), but it is in Swedish.

When I was in elementary school (in Sweden), we received free lunch in the cafeteria every day. There was always a hot meal prepared by the cafeteria staff, as well as bread and side dishes. Each day, two students from one of the classes were assigned to help the staff prepare lunch and wash dishes. I always thought this was a great system because the food was prepared in-house, not partially cooked, frozen and then shipped in from a central processing center. All of us kids were also learning about the process and what it took to provide lunch for the whole school.

According to this article, this is now a dying practice in Swedish schools, as well as in homes for the elderly. In many cases, lunch is centrally prepared by large catering companies and shipped out to all of the area schools. In addition, students no longer help with the food preparation and clean-up processes because everything has been brought in and must only be heated up. The authors cite many problems with this new system, including the toll this type of food preparation takes on the nutritional value of each ingredient. For example, the authors cite a Dutch study showing how antioxidants found in brussels sprouts and broccoli are destroyed in the various preparation stages, leaving those ingredients devoid of key nutritional value. This new system has also led to parents and students having decreased knowledge about what is actually in the food served at school.

This article served as a wake-up call for me to realize that this is going on all over the world. This is not a problem that we in the US struggle with alone, and it's so important to deal with the issues surrounding school lunches (and meals provided in elderly care homes) before we lose touch with what is going into our bodies at such a young age.

Thursday, August 5, 2010

Summer Salad


During the summer, my husband and I love to have big salads for dinner. We tend to keep it simple, using a few select, but very fresh ingredients. Tomatoes are a favorite at this time of year. A salad is enough for the two of us, but if it's not enough for you, I suggest getting a fresh whole grain bread from your favorite bakery and perhaps a nice cheese or hummus to spread on top.

We make our own dressing at home, as we have found it to be much more budget and health-friendly than many store-bought dressings. It is a great way to save money on your weekly grocery shopping. The process of making your own dressing is very quick and easy, and we usually have the ingredients at home for other reasons anyway. An added bonus is that you avoid all of the preservatives and additives (including high amounts of sodium) that can be found in many pre-made dressings.

Dressing:

2 tbs. extra virgin olive oil
1 tbs. balsamic vinegar
1-2 tbs. mustard, depending on your preferences
Salt and pepper to taste

Whisk the balsamic vinegar and mustard until blended. Add the olive oil and whisk until incorporated. Add salt and pepper to taste.

Salad:

Mixed salad greens, a large bunch (we like to mix spinach and arugula, for instance)
A large handful of ripe tomatoes, chopped as you like
1 can beans (cannellini or garbanzo work great)
~2.5 oz goat cheese

Pour dressing into your salad bowl. Add the tomatoes and beans, mixing with the dressing. Chop the salad greens, before adding to the bowl. Mix with dressing and other ingredients. Finally, break the goat cheese down into chunks and add to the salad. At this point, you can choose to mix gently, creaming the cheese slightly, or just serve with the cheese on top.

Serve with a bright red or summer rose wine.

Saturday, July 31, 2010

Edible Explorations Book Club: Grub by Anna Lappe and Bryant Terry


Grub: ideas for an urban organic kitchen, by Anna Lappe and Bryant Terry, is in many ways similar to Mark Bittman's Food Matters, recently reviewed here. Grub is divided into two main parts: a discussion of organic food and how it relates to our health, diet, environment and the American food industries, and a selection of "Grub"-style menus with recipes and wine suggestions. Essentially, Lappe and Terry are outlining a new dietary plan involving organic and whole grain food, and focusing on home-cooking.

Part 1 is written by Lappe, highlighting the reasons for supporting the organic movement, and debunking many of the arguments against organic farming, such as efficiency, cost, and lack of product choice. She makes a strong argument for why you, the reader, should adopt the authors' plan (called Grub), and outlines how to prepare your kitchen and pantry for this new style of eating.

One small section I found very helpful was the Cheat Sheet for a Cocktail Party, consisting of the "top 10 reasons why eating grub is a very good idea". These are short elevator speeches you can use at parties or when you end up in a discussion with someone skeptical of the organic movement (if you, yourself are a supporter of course).

The second part of the book, written by Terry, is full of Grub recipes, divided by theme and season. Many of the recipes sound very good, and he incorporates Tina-approved ingredients, such as whole wheat pasta and other whole grains. I did think some of the meals had too many elements, calling for a substantial amount of time in the kitchen and the creation of a lot of dishes. This is something I try to take into consideration, especially when cooking during the week. Perhaps those menus could be saved for a special occasion.

Check out the Grub website for more information on the recipes and shopping lists.

Tuesday, July 27, 2010

Hummus


One of my favorite snacks and sandwich spreads is hummus. I like it on bagels, in wraps, or on just about any kind of sandwich. I have also found it to be good with salads. Hummus tends to travel very well, so I like to bring it when am bringing my lunch with me to work, for a picnic or anywhere really.

1 can chickpeas, rinsed and drained
3/4 of a lemon, juiced
2 garlic cloves, crushed
1 1/2 tbs. olive oil
3 tbs. tahina (or more to taste)
3 pinches chopped parsley
1/2 tsp. ground cumin
1/4 tsp. paprika
2 tbs. water
Salt, to taste

Place chickpeas in a food processor and blend to break down. Add tahina and water, blending until beginning to form a smoother paste. Add crushed garlic and half of the lemon juice. Blend until smooth. Add 2 pinches chopped parsley, cumin, paprika, salt and rest of lemon juice. Process until well mixed.

With the processor running, add the olive oil until blended. Taste the hummus and add more garlic, tahina, lemon juice, or seasoning as desired. This makes a fairly thick hummus that lends itself to sandwiches, but if you desire a looser, creamier texture, you could add more tahina or water to loosen the mixture.

Garnish with parsley, whole chickpeas, paprika or olive oil.

Thursday, July 22, 2010

Edible Explorations Book Club: Food Matters by Mark Bittman


Food Matters: A Guide to Conscious Eating, by Mark Bittman, is just plain fun to read. His writing is very accessible, flows well and his recipes are easy to follow, often lending themselves well to customization. The first half of the book is a general overview of Bittman's healthy eating plan - how he changed his way of eating and why. He discusses the sordid details of the meat industry, the American diet, and how this has changed for the worse in recent history. Bittman offers not a diet, but a lifestyle change, and makes it sound easy and fun. This is a great book for someone looking to change how and what they eat, but who doesn't quite know where to begin. He even offers a sample meal plan for a month.

As previously alluded to, the wonderful thing about this book is that it is completely pliable for each individual. Bittman's plan is very general and flexible. Each reader can adjust to his/her personal tastes. In line with this, the second half of the book provides 75 recipes, divided into each meal of the day. These are general, with ideas for substitutions and customization. This section includes some great ideas on how to incorporate whole grains, small amounts of meat and increased amounts of fruits and vegetables into your diet.

I highly recommend giving this book a read. It is very informative in terms of the food industry in this country as well as personal nutrition. My only criticism is that Bittman is sometimes too general when specifics would benefit his readers. For instance, in the section on stocking your kitchen, he doesn't give specific ideas about what ingredients are best to keep around (spices, specific grains and vegetables, etc.). For people who have not cooked much previously and are looking to start fresh, it would be a good idea to give more information.

Saturday, July 17, 2010

Update: Homemade Peanut Butter, Take 2


In my first post, I discussed my first attempt at making peanut butter at home. Since then, I have been working on the recipe, trying to make it healthier and smoother. I think I have made some improvements on both fronts, and am set on relying solely on homemade peanut butter from now on.

My new-ish and improved recipe is as follows:

15 oz. roasted, unsalted peanuts
~1/2 tsp. salt (no more, but can be slightly less)
1 tbs. honey
1 tbs. grapeseed oil

Add the peanuts to your food processor in small batches, making sure that all of the peanuts are broken down and beginning to clump together before adding the next batch. Once all of the peanuts are in the machine, run the food processor for a few minutes, until the natural peanut oils have been extracted and the mixture is becoming a paste. Add the salt and honey to the peanuts and blend together for a few minutes, until the mixture resembles a ball of dough. With a spatula, spread the peanut butter out, so it is not clumped in one big ball. While you run the processor again, add the oil and let blend together with the mixture. You will want to stop the machine occasionally to make sure none of the peanut butter is sticking to the underside of the blade. When you think the peanut butter is done, let the machine run for about another minute.

The key seems to be to keep processing the mixture longer than you think you need to. The longer you let the peanuts process, the more natural peanut oil is released, and the less oil you need to add.

I have reduced the amount of honey by 1/2 tbs. and the amount of oil by 1 tbs. This has, of course, greatly helped the calorie content of my peanut butter since many of the calories came from the grapeseed oil.

Since I began making this at home, I have noticed that we are not going through our peanut butter jars by week's end, as we used to do with store-bought peanut butter. I believe this is due to the robustness and increased peanut flavor in my homemade variety. We don't need to use as much on our sandwiches because the consistency is much thicker. Thus, we are now saving money by making the peanut butter at home.

Tuesday, July 13, 2010

Adam's Vegetable Paella


My husband, Adam, recently made this for dinner, and I feel that this meal encompasses much of what Edible Explorations is all about. This meal is both healthy and frugal, and can be adapted for all seasons, thus promoting the use of local ingredients. Many of the ingredients are flexible, meaning that substitutions can easily be made depending on what you have at home or what you can easily obtain.

The type of paprika you use is optional (it does not have to be smoked). Paprika can be easily obtained from any grocery store, but it is usually more budget-friendly to try to find a natural foods store that sells spices in bulk, or an ethnic market with a spice section. If you are in a pinch, you can substitute turmeric for saffron. Your paella will not have the exact same flavor, but it will have the same coloration (and it will definitely still taste good). In addition, you can use white button mushrooms instead of shiitakes (we just happened to have them at home). This would definitely be a way to increase the frugality of this meal. If you are vegetarian, you can substitute in vegetable broth, or if you are in a pinch, you can simmer the mushroom stems in water for an hour to make a cheap, homemade broth.


1 cup short-grain brown rice
1 1/2 cups chicken broth
1 medium onion, finely chopped
2 garlic cloves, finely sliced
1 small zucchini, cut any way you please
5-6 shiitake mushrooms, with stems removed
2 tbs. tomato paste
3 small tomatoes, cut into thick wedges
3 tbs. olive oil (2tbs. for the rice, 1 tbs. for the veggies)
A pinch of saffron
1 tsp. smoked paprika
Salt and pepper to taste

Preheat the oven to 425 degrees Fahrenheit.

Begin by par-boiling the rice for 12 min., in slightly salted water.

Saute onion and garlic in oil, until translucent. Add tomato paste and cook with the onion and garlic until the paste begins to darken. Stir in the paprika and cook until fragrant. At that point, add the rice and let toast for approximately 1 minute.

Add chicken broth, saffron, and a pinch of salt to the mixture and bring to a boil on the stove-top. When the paella comes up to a boil, neatly arrange the veggies on top of the rice, pressing slightly.

When the paella has reached a healthy boil, place in the oven for approximately 15 minutes, or until the liquid has been absorbed and the veggies are cooked through.

Serve hot.

Thursday, July 8, 2010

Edible Explorations Book Club: Harvest For Hope by Jane Goodall


Much like other books of this sort, Harvest For Hope, by Jane Goodall, is a good overview. It is mainly written from an anthropological perspective, which is unique, but I did feel that she included much of the same information as other authors do. For example, Goodall uses Joel Salatan's farm in Virginia as an example of a deep organic farm; this is the same farm and farmer Michael Pollan devotes much time to in The Omnivore's Dilemma.

However, Goodall's discussion of GMO (Genetically Modified) products was very interesting and covered information I did not previously know. It also led me to a website listing common brands that use and do not use GM seeds (The Center For Food Safety Shoppers' Guide). I had not thought about how pervasive GM products are in the food industries, including the meat industry. If an animal is given feed grown from GM seeds, the meat you buy could have traces of GM products. Goodall also included an interesting discussion of how animals will instinctively stay away from feed that comes from GM seeds, if given the option between that and organically-based feed. Products certified as organic cannot contain any GM ingredients.

Given her background in anthropology and primatology, it is not surprising that Goodall's discussion of animals and their treatment was so comprehensive and moving. She writes with such passion for the animals and describes vividly and eloquently the horrors of the conditions many animals are forced to live in. It definitely convinced me to be careful of where my meat comes from.

Tuesday, July 6, 2010

Ginger-Carrot Muffins


In my latest exploration of healthier snack food, I am trying my hand at muffins. I have a weakness for coffee shop muffins, but of course they are a "sometimes food". Instead, I am trying healthier, homemade muffins of various kinds. These, based on a recipe from Cooking Light (August 2007), are a first try:


1 cup all-purpose flour
1/4 cup cane sugar
1 tsp. baking soda
1/2 tsp. ground ginger
1/8 tsp. salt
1/4 cup plain, low-fat yogurt
1/8 cup grapeseed oil
1/8 cup low-fat milk
1/2 tsp. vanilla extract
1 egg
1 egg white
1 1/2 cups grated carrot
1/4 cup dried currants (or raisins)
1/8 cup chopped pecans, toasted

Preheat the oven to 350 degrees Fahrenheit. Either grease a muffin tin or place paper muffin cup liners in the tin.

Combine the flour, baking soda, ginger, and salt in a large bowl and stir with a whisk. Make a well in the center of the mixture. In a smaller bowl, combine yogurt, grapeseed oil, milk, vanilla extract, egg white, and whole egg. Whisk together well and then add to the dry ingredients. Stir until just moist. Add carrots, currants and pecans and fold in carefully.

Spoon the batter into the muffin tin. Bake at 350 degrees for 25 minutes, until muffins spring back in the center. Remove from pan immediately and let cool on a wire rack. (They are also really good on re-heat).

Yields 9 muffins.

Monday, June 28, 2010

Sunshine Bars

Instead of eating 3 larger meals per day, I tend to eat breakfast and dinner, but graze through lunch into the afternoon. I like to eat small portions of multiple foods instead of lunch. However, I don't usually buy snack food from the grocery store because it is difficult to find genuinely healthy products and it gets expensive quickly. There are plenty of brands that advertise for healthy snacks, but when you read the nutritional information, high amounts of salt, fat and additives are often included. As a way to rectify the situation, I began to make my own snack food. One of my favorite recipes comes from The New Laurel's Kitchen by Laurel Robertson, Carol Flanders and Brian Ruppenthal. I have adapted the recipe to suit my tastes, and you can vary it to suit yours.

Sunshine Bars:

1/2 cup orange juice
1/2 cup dried apricots
1/4 cup honey
1/4 cup grapeseed oil
3/4 cup rolled oats
1/2 cup whole wheat flour
1/2 cup wheat germ
1 tsp. cinnamon
1/4 tsp. salt
1/2 cup raisins, cut up
1/3 cup toasted almond meal

Preheat oven to 350 degrees Fahrenheit. Begin by chopping the raisins (I like to cut them in half, but you can do any size you like). Toast the almond meal in a skillet until it has a nice nutty smell. Meanwhile, heat orange juice to a boil in a small saucepan. Add dried apricots to the juice, bring to a boil again, cover and turn off heat. Let apricots sit until they absorb enough juice to become slightly tender.

While apricots are sitting, mix honey and oil together in a small bowl. In a larger bowl, stir together oats, wheat flour, wheat germ, cinnamon and salt. Add raisins and toasted almond meal to the dry ingredients.

When apricots are slightly tender, remove from pan and chop coarsely. Add the remaining orange juice to your honey and oil mix, and stir until combined. Add chopped apricots to dry ingredients and stir together. Combine wet and dry ingredients in the large bowl and stir until well mixed. Press the "dough" into an 8x8 square baking dish lined with parchment paper (or whatever size you have handy). Bake for 30 minutes. Remove from oven and cool completely before cutting into squares.

I have added about twice as much cinnamon as the original recipe calls for because I find Laurel's recipes to be slightly under-seasoned for my taste (but I am a self-acknowledged cinnamon fiend...). Overall the recipe usually tastes great and it's fairly fool-proof.


Tuesday, June 22, 2010

Edible Explortions Book Club: Diet For A Small Planet


Since reading Diet For A Hot Planet, by Anna Lappe, I thought I should read her mother's work as well. Diet For A Small Planet is really the foundation for much of the writing about the food movement since the 1970's. Because I have read more recent works, Frances Moore Lappe was not saying much I did not already know, but I found her personal journey very inspiring. She also included some interesting facts about common protein myths, including other sources for Vitamin B12. I did not, for instance, realize that tempeh is a good source for B12, but I am very excited since I love tempeh!

However, although I found her journey to writing Diet For A Small Planet personally inspiring, in reading the 20th Anniversary Edition, there was too much discussion added concerning her work since writing the book, which pointed the reader towards her Institute for the Arts of Democracy and Food First organizations. I did not want to feel as though she was advertising for her other work.

I would say that this book has always been, and will continue to be, a great foundational resource for those interested in food and the ongoing food movement, but I actually thought that Anna Lappe's book would be a better resource for people looking to begin their search for knowledge about the food industry nowadays.

Monday, June 14, 2010

Feeding Your Pet (Cat)


One of the things I have been thinking about lately is how to feed my cat in a healthy and sustainable way. We currently feed our cat Science Diet Hairball Control Light dry food and Fancy Feast wet food. Both have pretty low fat content percentages. Fancy Feast Classic Seafood Variety has 2.0-4.0% fat content, depending on the type of fish, and Science Diet has 7.2-9.5% fat content. Kia, our cat, has lived with us for about 5 1/2 years. I say lived because, as many cat "owners" know, I believe she probably owns me more than I own her. We first met her at an ASPCA shelter about 5 1/2 years ago and adopted her then (she was almost a year old).

Kia has struggled previously with her weight and overeating, so we have had her on a meal plan for a number of years instead of free-feeding. We would like to give her healthy, nutritious food that doesn't have all of those additives and chemicals that most pet food brands include. For example, the Science Diet we feed Kia has chicken by-product meal, chicken liver flavor, and animal fat with mixed tocophenols. How about naming the specific animals? The Fancy Feast wet food has meat by-products, Red Dye #3, and Turkey (in seafood?). I know from having read
Fast Fo
od Nation by Eric Schlosser that Red Dye #3 is not good for people, so I think I can safely assume it is not good for cats either. As for the other ingredients, I took a few minutes to peruse the Internet and found some disturbing factoids. However, since this information is not coming from a source I know and trust, I will not expand until I have conducted further research. I recently went to both Petsmart and Petco to get a few other things for Kia and decided to go through all of their "natural" food choices. Although some of them do use healthier ingredients, such as real meat, brown rice and veggies, they all had a high fat content, especially compared to the dry food she eats now.

Why is there nothing available that is low-fat with quality ingredients, providing all the nutrients that a cat (or dog) needs? I would like to be able to make food for her myself, but since I am not a veterinarian, I am not even sure where to begin. I don't know exactly what my cat needs on a daily basis in terms of protein, fat, carbs, etc. and I don't know what other vitamins and nutrients she needs. Are there resources for people who want to make their own cat food?

I was thinking of suggesting that my vet have a workshop or seminar on this topic. I feel like a lot of people could benefit from learning more about this topic. Plus, as with most foods, I suspect that homemade would actually be cheaper than store-bought cat food, and it would be nice to control what is going into Kia's system.

Thursday, June 10, 2010

The Search for Loose Leaf Tea


I am a tea drinker. Always have been, probably always will be. For as long as I can remember, I have begun my mornings with a cup of hot black tea. Of course, it seems that lately that cup has turned into several, but that's another story. My husband and I were trying to find, and are perpetually on the hunt for, good loose leaf tea that is not exorbitantly expensive. Over the years, I have come to realize that this is a very difficult process. There are so many facets to consider - quality of the tea, the price, the processing, where and how the tea was grown, as well as the sustainability and labor practices of the plantation and the distributing company itself. I know from having seen the Steeped in History exhibit at UCLA's Fowler Museum of Cultural History that the environmental and labor practices of each tea plantation are very important. However, unless you want to pay A LOT of money, it is very difficult to take this into consideration when looking for everyday tea.

This brought me to the question: how do you choose what's best environmentally and socially, but still maintain your pocketbook? We usually go to our local Halal and Indian Markets here in LA for our everyday tea. These local, ethnic markets are such a good source for so many products - tea, spices, bean and legumes, rice, flour and the list goes on. If you have access to this type of establishment, I highly recommend shopping there for any products that are commonly used in the associated country or region. In this case, I know that much of the tea we drink is grown in India, and much of the tea consumed in the world is consumed in India. Therefore, it seems only logical to buy our tea from an Indian grocer.

There are some brands that you can order online - Two Leaves and a Bud is among my favorites - but it is more expensive. I consider these teas my "sometimes" teas. This brings me back to the excellent point Anna Lappe made in Diet for a Hot Planet: it's probably better to cut down on usage of a certain product and be able to spend more on quality. However, as previously alluded to, this may be a very difficult process for me!

Since this is one of our everyday staples, I am always researching this topic and will continue to post updates as I come by more information...

Friday, June 4, 2010

Edible Explorations Book Club: Diet for a Hot Planet by Anna Lappe


This book is a great introduction to the topics of sustainable eating and the climate crisis. Lappe writes in an intelligent way, not dumbing her writing down, as if readers would not be able to understand. She uses mainly scientific and academic sources in her writing, and does not fall into the trap of making unsupported statements that a lot of general information books do. I personally prefer someone who speaks intelligently and supports her claims with published facts.

As far as the topic she was writing about, it was a mix of new information and a lot of things I already knew (but I tend to read a lot about this stuff). I think we, the general public, need a book like this right now. It breaks down what the problem is, why it's a problem, and gives us suggestions for how we can actually do something about it. Lappe also shows us how large corporations are essentially fooling us into thinking they are doing something about the climate problems. She illustrates how they are using smart advertising and innovative language in an attempt to avoid doing anything at all.

Unfortunately, I came away from this book feeling a little overwhelmed by how big of a problem this is and not really knowing where to begin. I did make note of many of the resources she provides, so perhaps that will help me to continue researching. The main thing I took away from this book is that I need to be much more careful about what brands of products I am buying, where the ingredients are coming from, and what policies these corporations are following. I get too easily lulled into the "everything at Whole Foods is alright" trap. It's really not. We all need to be watchdogs to take care of what is going into our bodies, the land we live on, the water we drink, etc.

I really liked Lappe's idea of saying it's ok to eat beef/red meat, but to cut down how much you are eating and to buy higher quality meat instead. Also, I will be much more careful about ordering in restaurants, because that is a way that I can really impact the industry. If I am making choices based on where the product comes from and the treatment of the animals, the restaurant will be forced to also, and so on...and as someone who has tasted grass-fed beef, it really does taste much better to boot!

Tuesday, June 1, 2010

Two days ago, I tried my hand at making homemade peanut butter. Being from Sweden, I did not grow up with peanut butter, but tried it first at age 6 while in the US, and have never looked back. I always used to eat Skippy Creamy PB, but in the last few years have switched to natural peanut butter. I like natural peanut butter for the better peanut taste as well as for the lack of additives and preservatives. Adam and I usually buy the creamy and salted peanut butter from Trader Joe's and we go through it quite quickly. I found a recipe on another blog (adapted from Alton Brown's recipe) and have tweaked it again myself:

15 oz. Roasted, Unsalted Peanuts
1/2 tsp. Sea Salt
1 1/2 tbs. Honey

2 tbs. Grapeseed Oil

Place a quarter of the peanuts in a food processor and begin to process until almost smooth. Add the rest of the peanuts in quarter portions in order to get a smoother finish. When peanuts are beginning to form a "dough", add the salt and honey. Process until well blended. While running the food processor, add the oil one tablespoon at a time. Run for another minute, or until the peanut butter has your favored consistency. Add more salt or honey to taste.

The flavor turns out great - it definitely tastes more like peanuts than store-bought PB. This recipe makes a stiffer, coarser peanut butter than most store-bought PBs. As for the ingredients, you can decide what to include. I chose grapeseed oil because it's heart-healthy as compared to palm oil, which is what Skippy uses in their Natural Peanut Butter. An added benefit is that you can control the amount of sodium you consume per serving. I figured out that my homemade peanut butter has 60.95mg/serving, whereas Trader Joe's PB has 130mg/serving and Skippy has 150mg/serving.

I have tried to calculate the calories per gram in my peanut butter versus the kind we buy from Trader Joe's. It looks like my product actually has 0.30 more calories/gram (6.24cal/g vs. 5.94cal/g), so it's not a big difference, but I have to admit that, in terms of calories, it is not healthier than store-bought natural peanut butter. I also ended up buying peanuts from Trader Joe's, but there has to be a better source of cheap, good quality peanuts out there. If I keep buying the Trader Joe's roasted, unsalted peanuts, the cost of making my own PB will actually be slightly higher than buying the Trader Joe's jars. However, because the homemade variety is much thicker and heavier, I don't think we will end up using as much per serving, so it may last longer.

I will definitely keep making my own PB, and not just because I like playing with the food processor. The benefits are enormous - it's super quick and easy to make, and you have complete control of the ingredients. No weird preservatives or additives, no over-oiling...and it's especially great for anyone with PBJ addicts in their household. My personal PBJ addict gave the homemade version two thumbs up!